
When you'll see this field
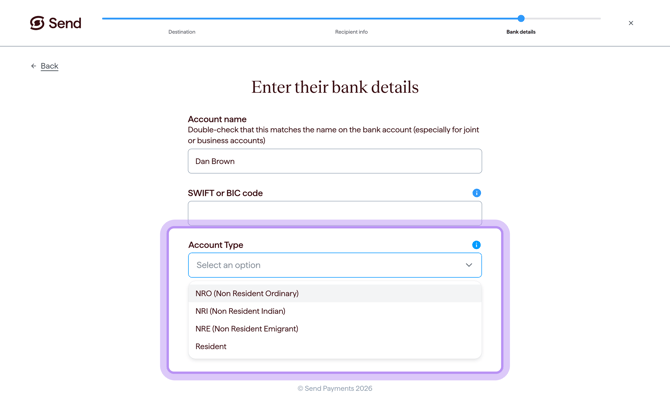
You'll see the Account Type field when:
- You are adding or editing a recipient in India, and
- The payment currency is INR (Indian Rupees).
The account type must match the account held by your recipient.
The field is required for every INR payment to India.
The Account Type is not the same as choosing between savings and checking. Pick the option that matches your recipient's actual bank account. If you are unsure, ask your recipient to check with their bank.
Which account type should I choose?
You'll see four options in the dropdown:
- NRO (Non Resident Ordinary Account): Select NRO where your recipient is a non-resident and their bank has confirmed that they hold an NRO account.
- NRE (Non Resident External): Select NRE where your recipient is a non-resident and their bank has confirmed that they hold an NRE account.
- Resident: Select Resident where your recipient is resident in India and holds a standard resident bank account.
Your recipient or their bank can confirm which one applies to their account.
Before you start
To set up an India recipient you'll need:
- The recipient's full name as it appears on their bank account
- The recipient's bank account number
- The recipient's SWIFT/BIC code (see Information on SWIFT/BIC numbers)
- The recipient's Account Type, confirmed by the recipient or their bank
- Any other information shown in Send.
Use the details provided by your recipient and follow the on-screen prompts in Send.
Step 1: Ask your recipient
Ask your recipient which Account Type their bank account is. The options are NRO, NRE, or Resident.
If they don't know, they can check:
- Their online or mobile banking app, in the account details section
- A recent bank statement
- Directly with their bank
If they’re unsure, ask them to contact their bank.
Step 2: Select the matching option in Send
Open your recipient's details in Send and select the Account Type confirmed by your recipient or their bank.
Step 3: Review and save the recipient
- Check that the all the recipient information is correct.
- Once you’ve checked the details, save the recipient and continue.
What happens next
- Once you save the recipient, we’ll review their details. You’ll be able to make a payment to them once they’ve been approved.
- If we need more information, we will get in contact with you for more details.
- Incorrect or incomplete recipient information may delay the payment or cause it to be rejected or returned.
Common questions
I don't know which Account Type to choose
- Ask your recipient. If they're unsure, ask them to confirm with their bank.
- Don't guess. Choosing the wrong Account Type can stop the payment from going through.
Is this the same as choosing 'savings' or 'checking' like in Australia?
- No. The Account Type for India is different. Pick the option that matches what your recipient's bank confirms.
My payment was delayed, rejected, or returned
- This can happen for several reasons, including incorrect or incomplete recipient details.
- Confirm the recipient’s name, account number, and account type with your recipient or their bank and then contact our support team for help with the next steps.
Contact us
Call Us
Phone: 1800 982 418
International: +61 7 5619 5700
Hours: 8:30am - 5:30pm AEST/AEDT, Monday - Friday